Introduction
The Single Sign-On (SSO) solution allows you to get one-click secure access to multiple on-premise and cloud-based applications using a single username and password.
A user guide is also known as a user manual, that helps you to assist in using a particular product, service, or application. This guide can be a written document associated with related images or screenshots.
In this document, you will be introduced to the user guide for SSO on Sapper 3.0.
| Table of Contents |
|---|
Overview
 The Single Sign-On (SSO) solution allows users to get one-click secure access to multiple on-premise and cloud-based applications using a single username and password. The
The core benefit of SSO is it helps you to log in seamlessly. It is also known as an authentication scheme that allows you to log in with a single ID to any of several related, independently. Further, these tools enable you to access multiple applications and services by using one set of credentials. You are allowed to access a variety of platforms and apps without login in every timemultiple logins. Single sign-on gives you the freedom to reduce the efforts of reducing the necessity to remember the remembering multiple passwords. SSO allows you to access all the integrated apps by providing a pop-up widget or login page with just one a single password. It eventually helps you to get a hassle-free solution for login into multiple applications.
SSO is based on the concept of federation ID. It shares identity attributes between trusted and autonomous systems. When you are trusted by the system, you can access it automatically, it will also be granted to all other users who have established a trust relationship with you. It forms the basis for modern SSO solutions, that can be made possible by protocols such as OpenID Connect and SAML 2.0. Sapper uses SAML v2.0 for conducting the SSO process.
How to use SSO on Sapper 3.0
The SSO process for Sapper 3.0 is associated with multiple steps. Those are mentioned below.
Click on My Account “My Account” from the sapper Sapper home page
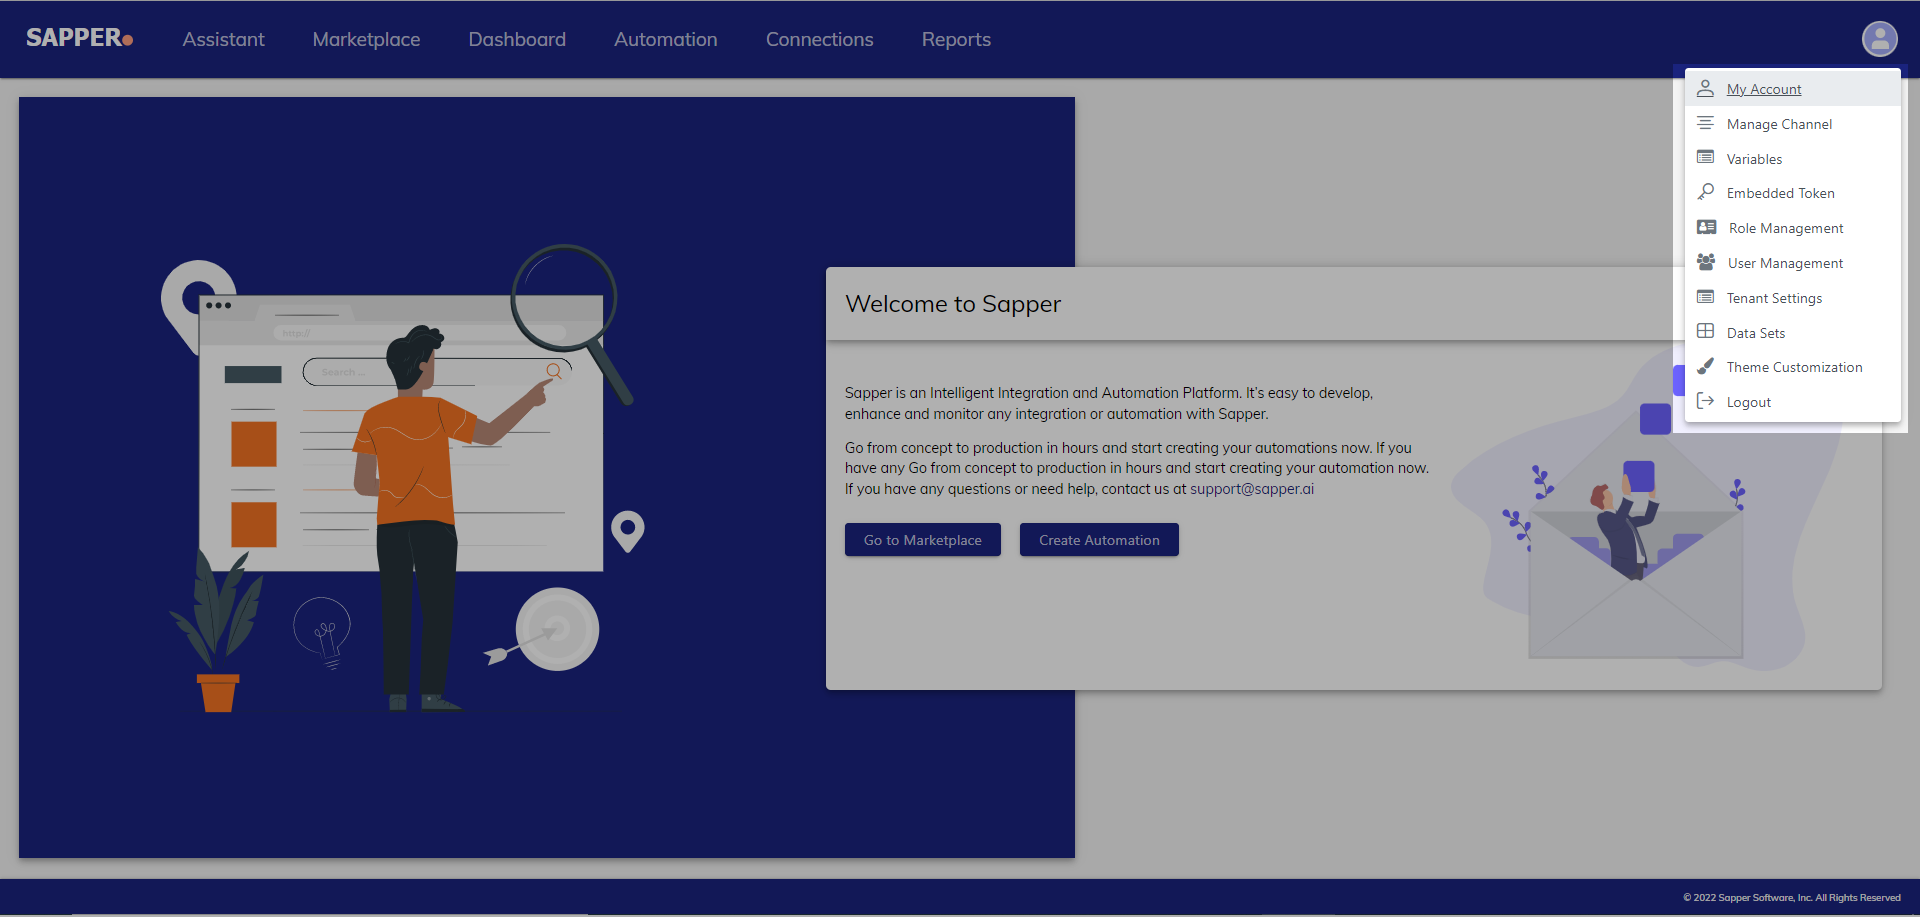
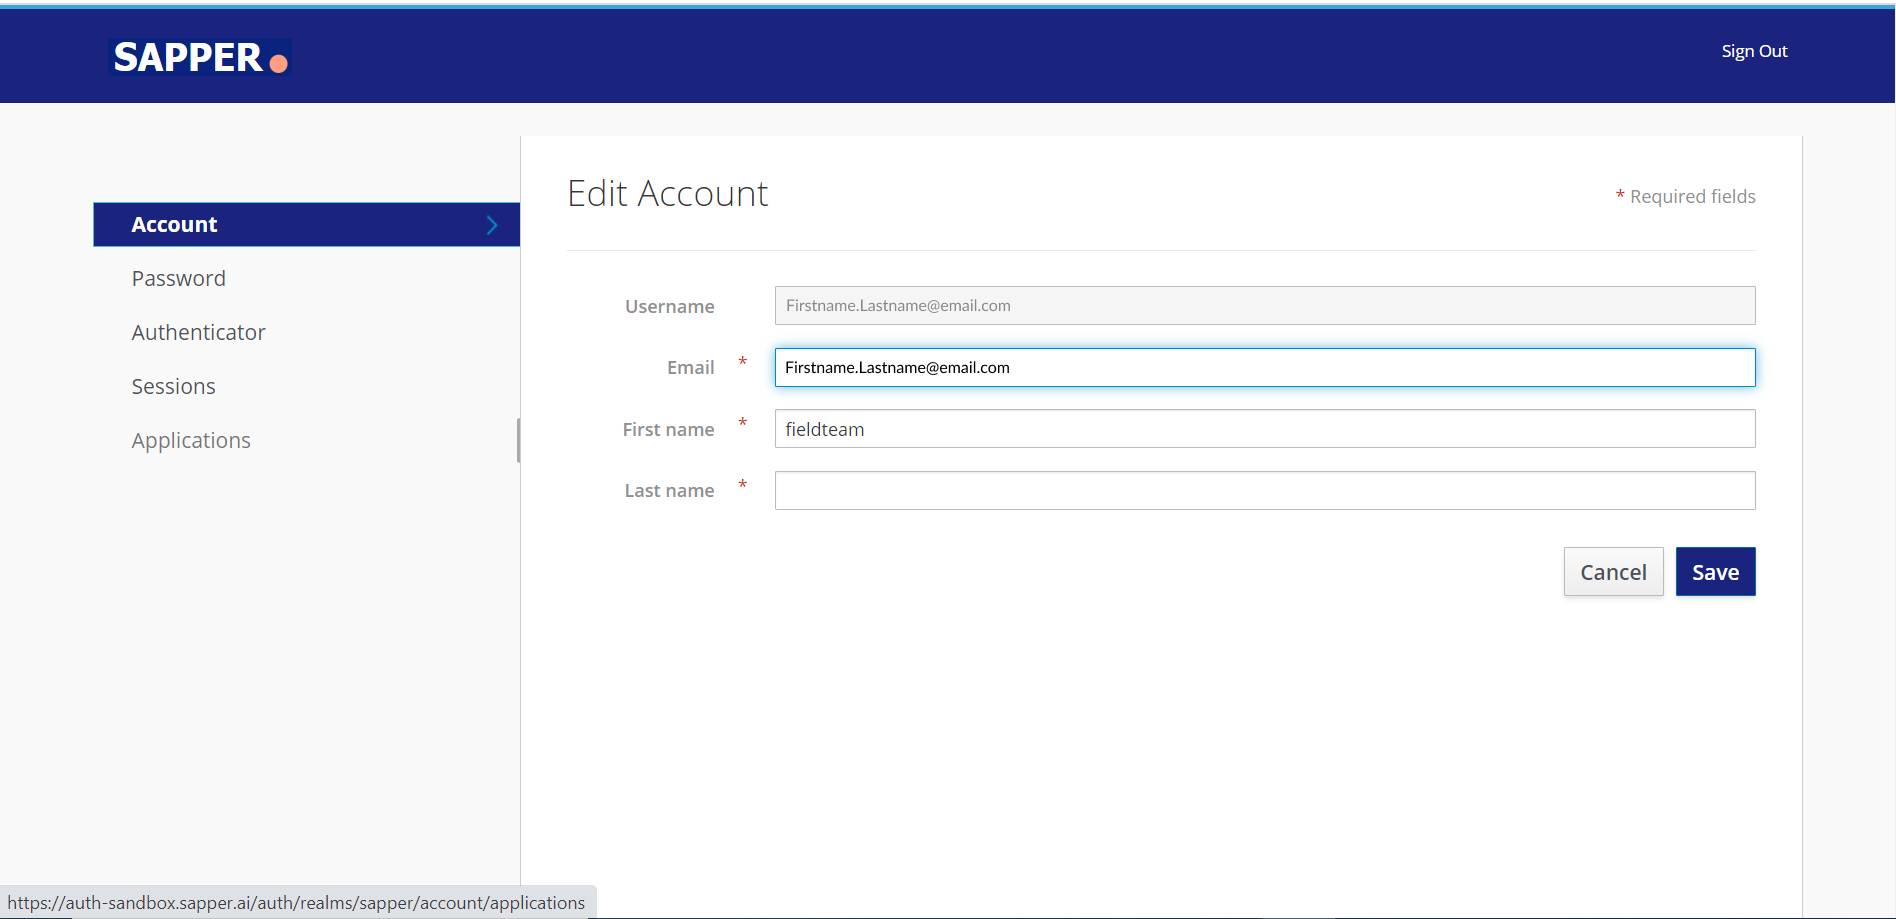
2. Once you open the My “My Account page page” you will get an option for the application“Application”.
3. Click on the application “Application” tab and you will get the option for “Security admin console”Admin Console”.
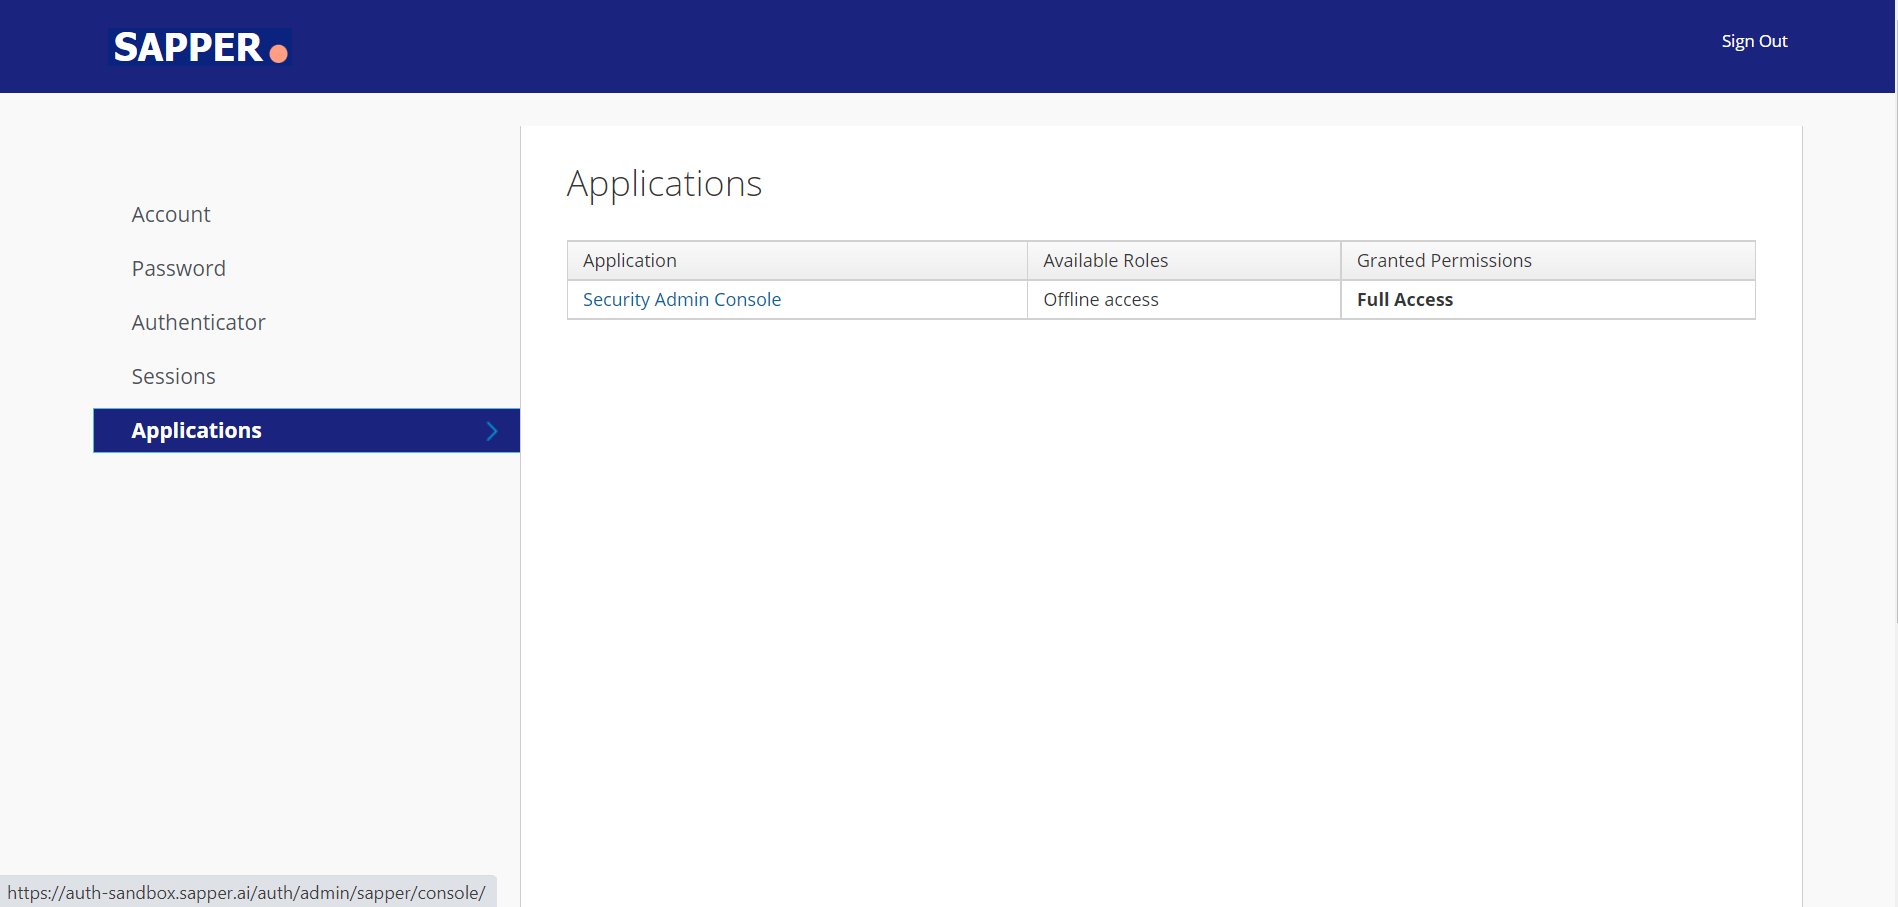
4. Once you click on the security admin console you will be redirected The “Security Admin Console” will redirected you to a new tab. There you will get 2 options i.e., Clients and Identity providers.
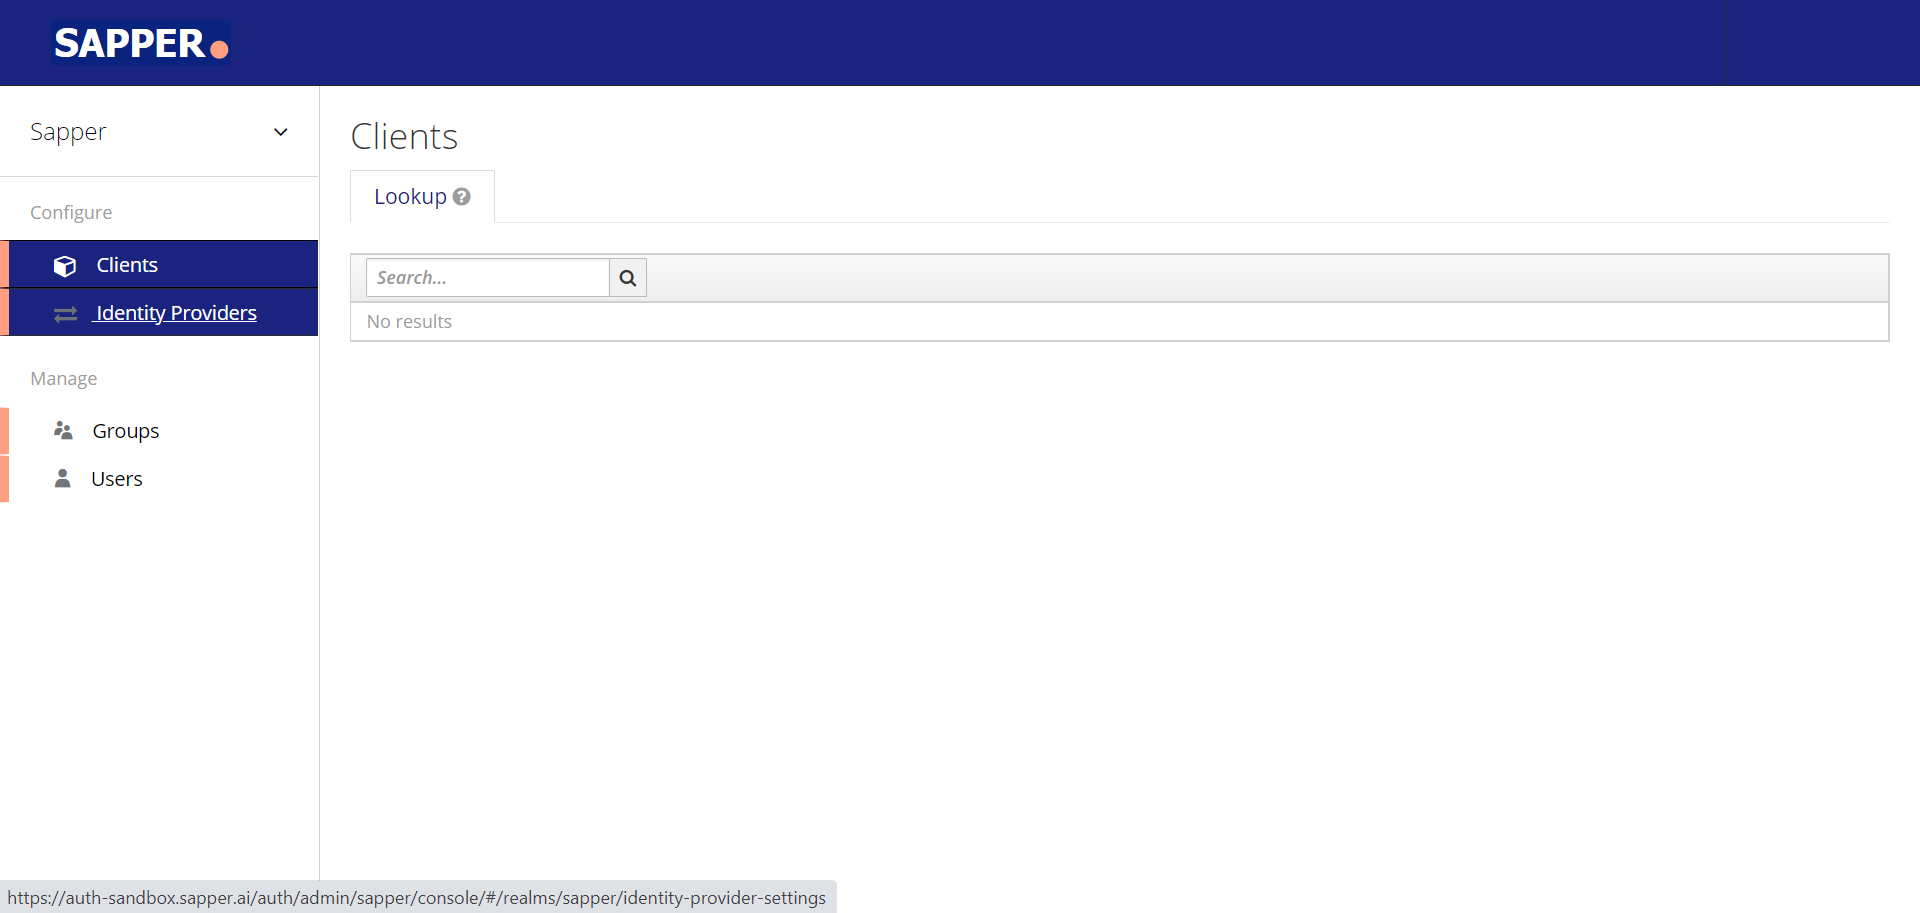
5. Click on the “Identity provider" and the tab page will be open on the screen. You will get the option for “Add Provider” in a dropdown box.
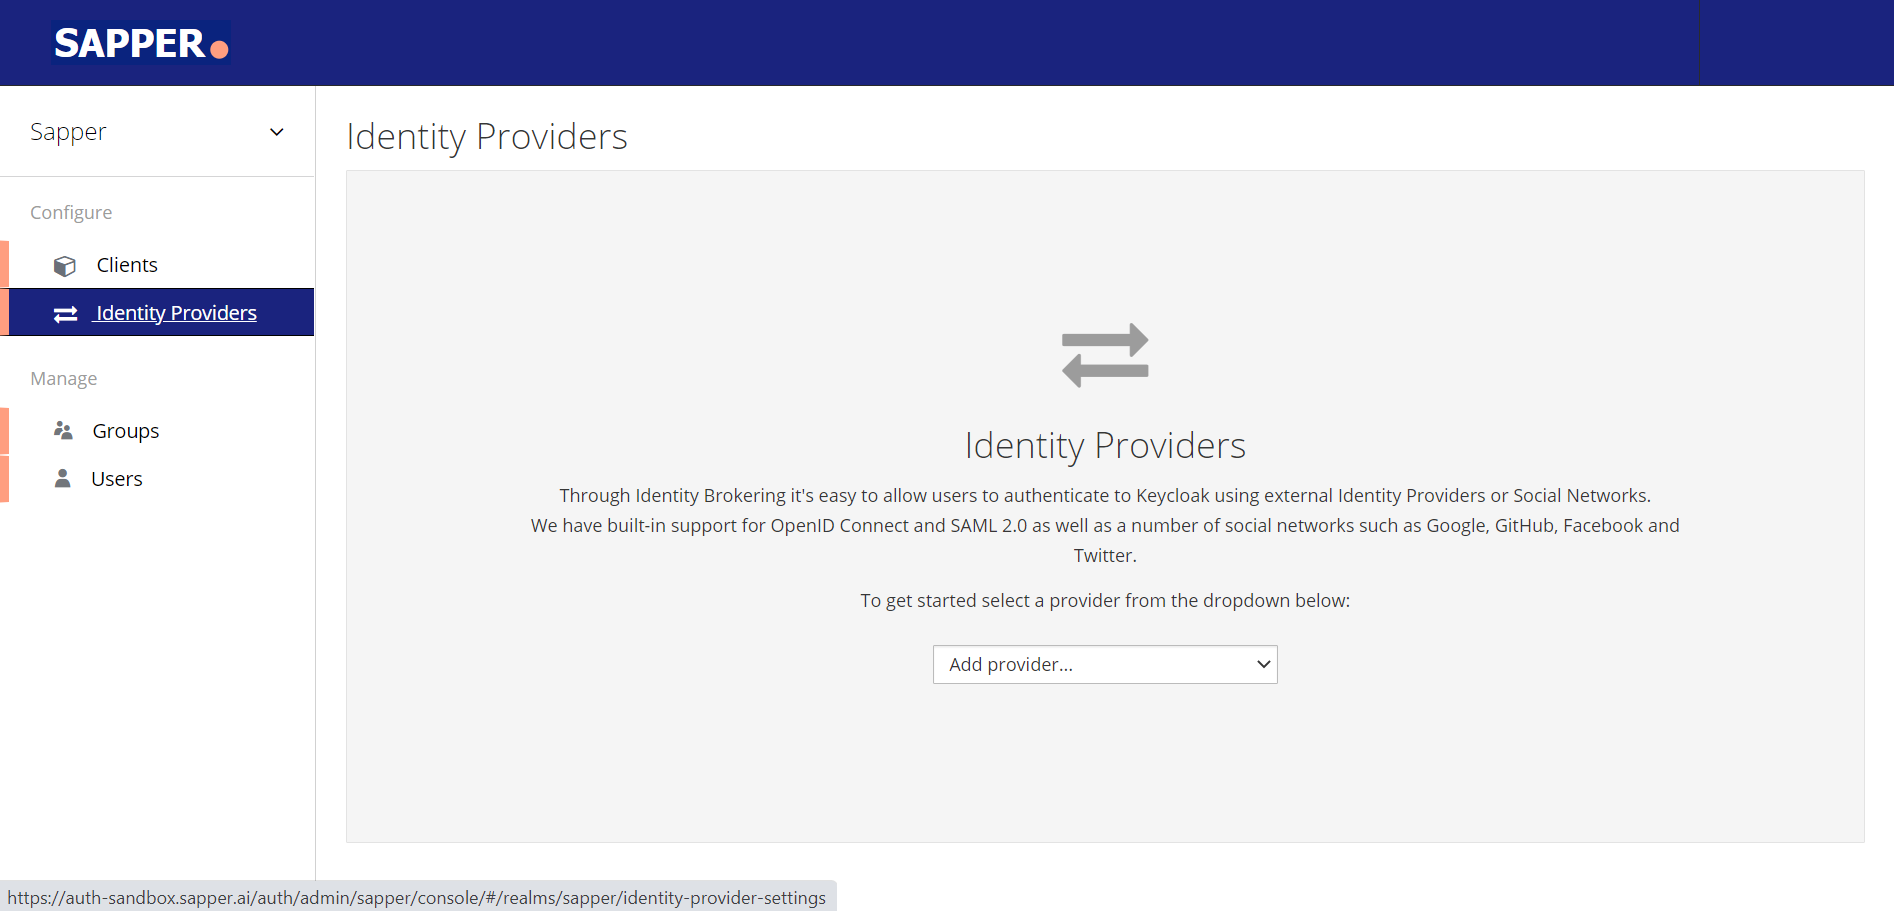
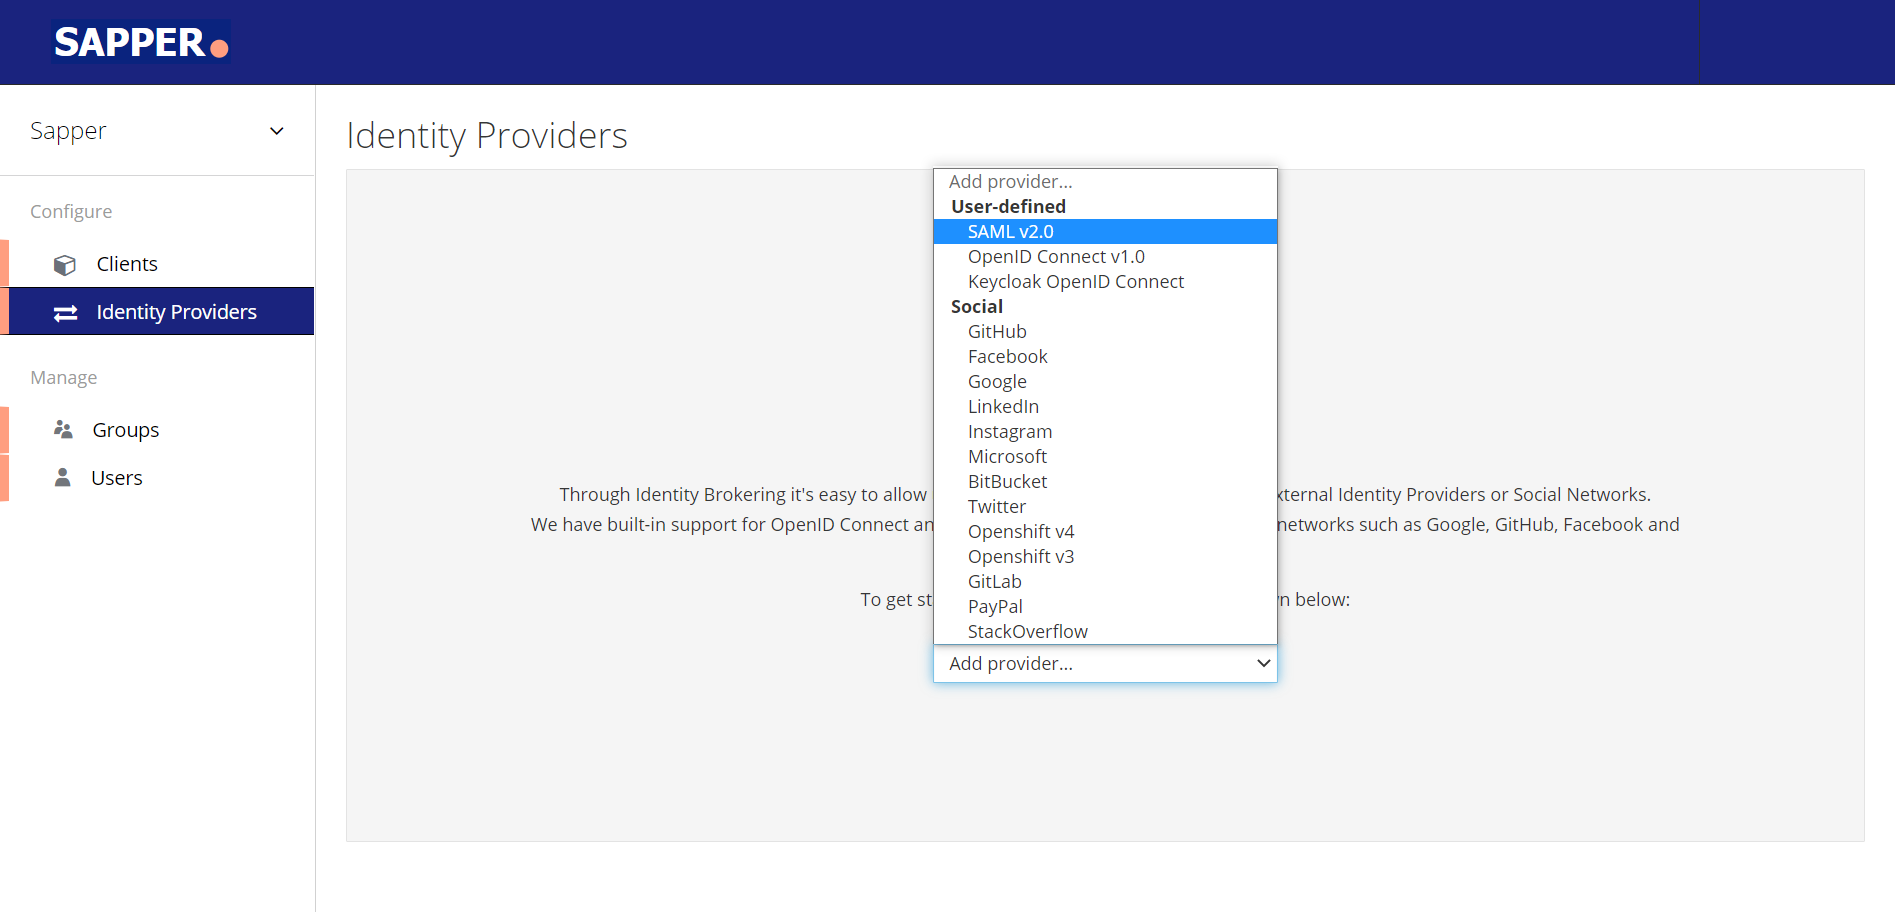
6. From the “Add Provider” dropdown field you need to add the required provider.
7. Click on the dropdown option, and select the required provider. Here we have selected SAML v2.0 as a identity provider.
8. Once you select the provider, you will be redirected to the Add identity provider pageNow, it will redirect you to the “Add identity provider” page for further information's.
9. Fill out the form by providing the name of the “Alias”. it is a part of “Redirect URI”. It’s required for configuring the SAML provider in Sapper.
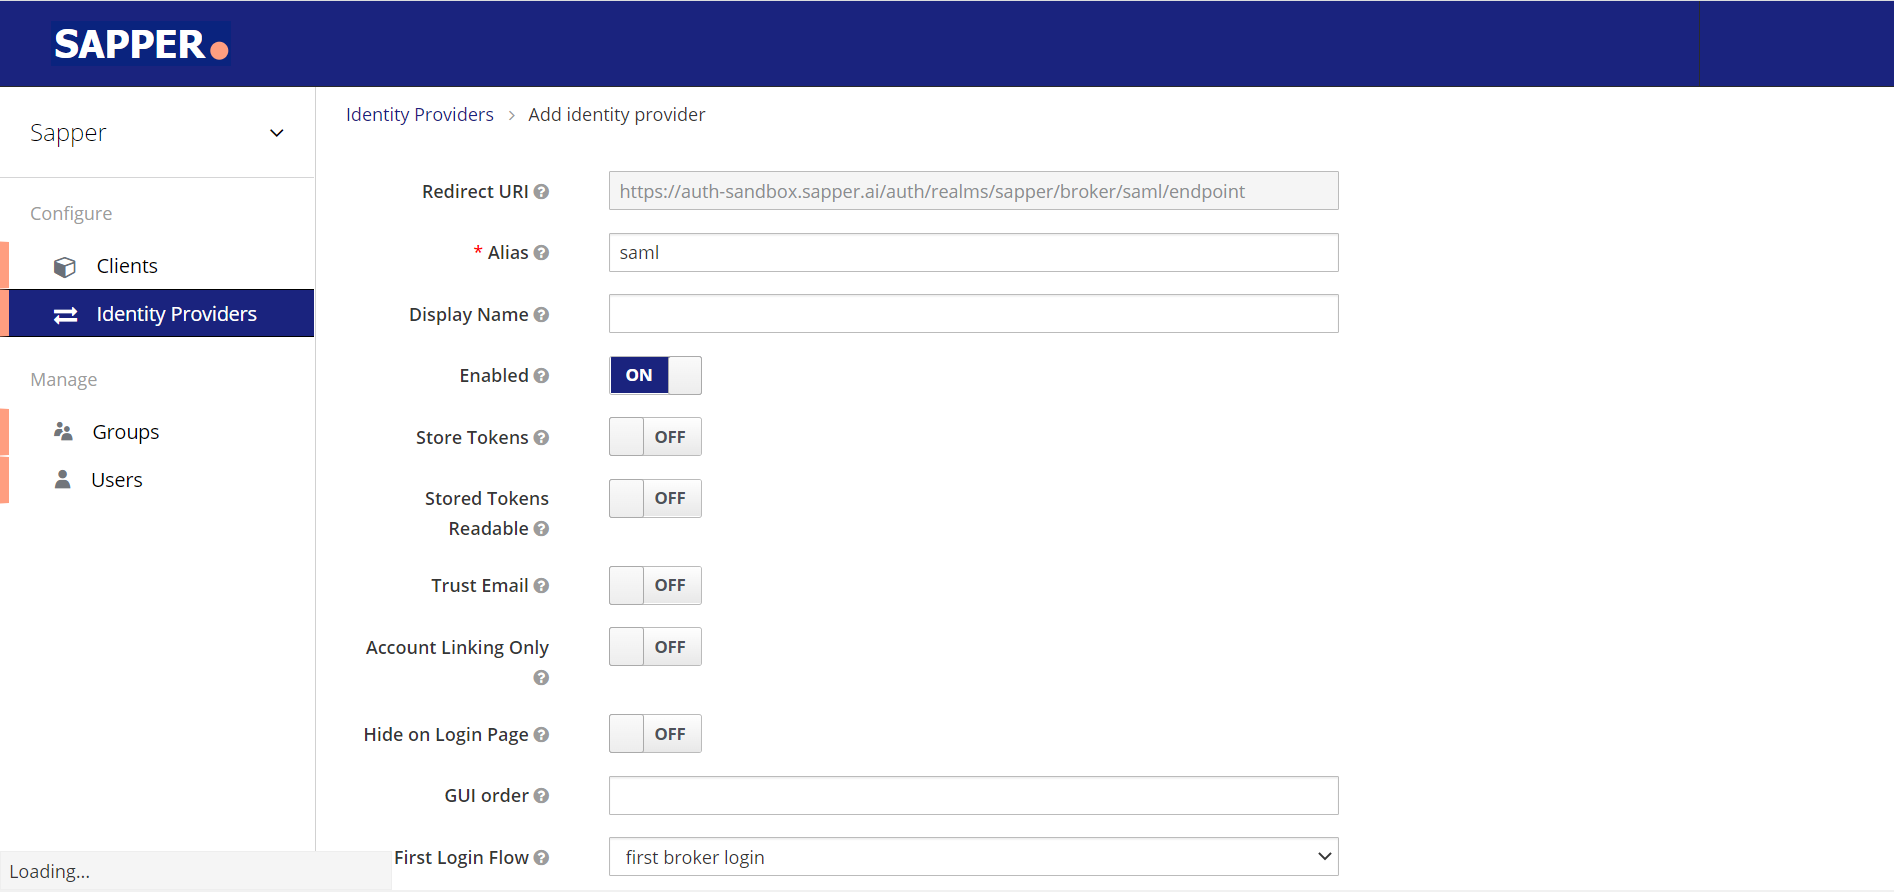
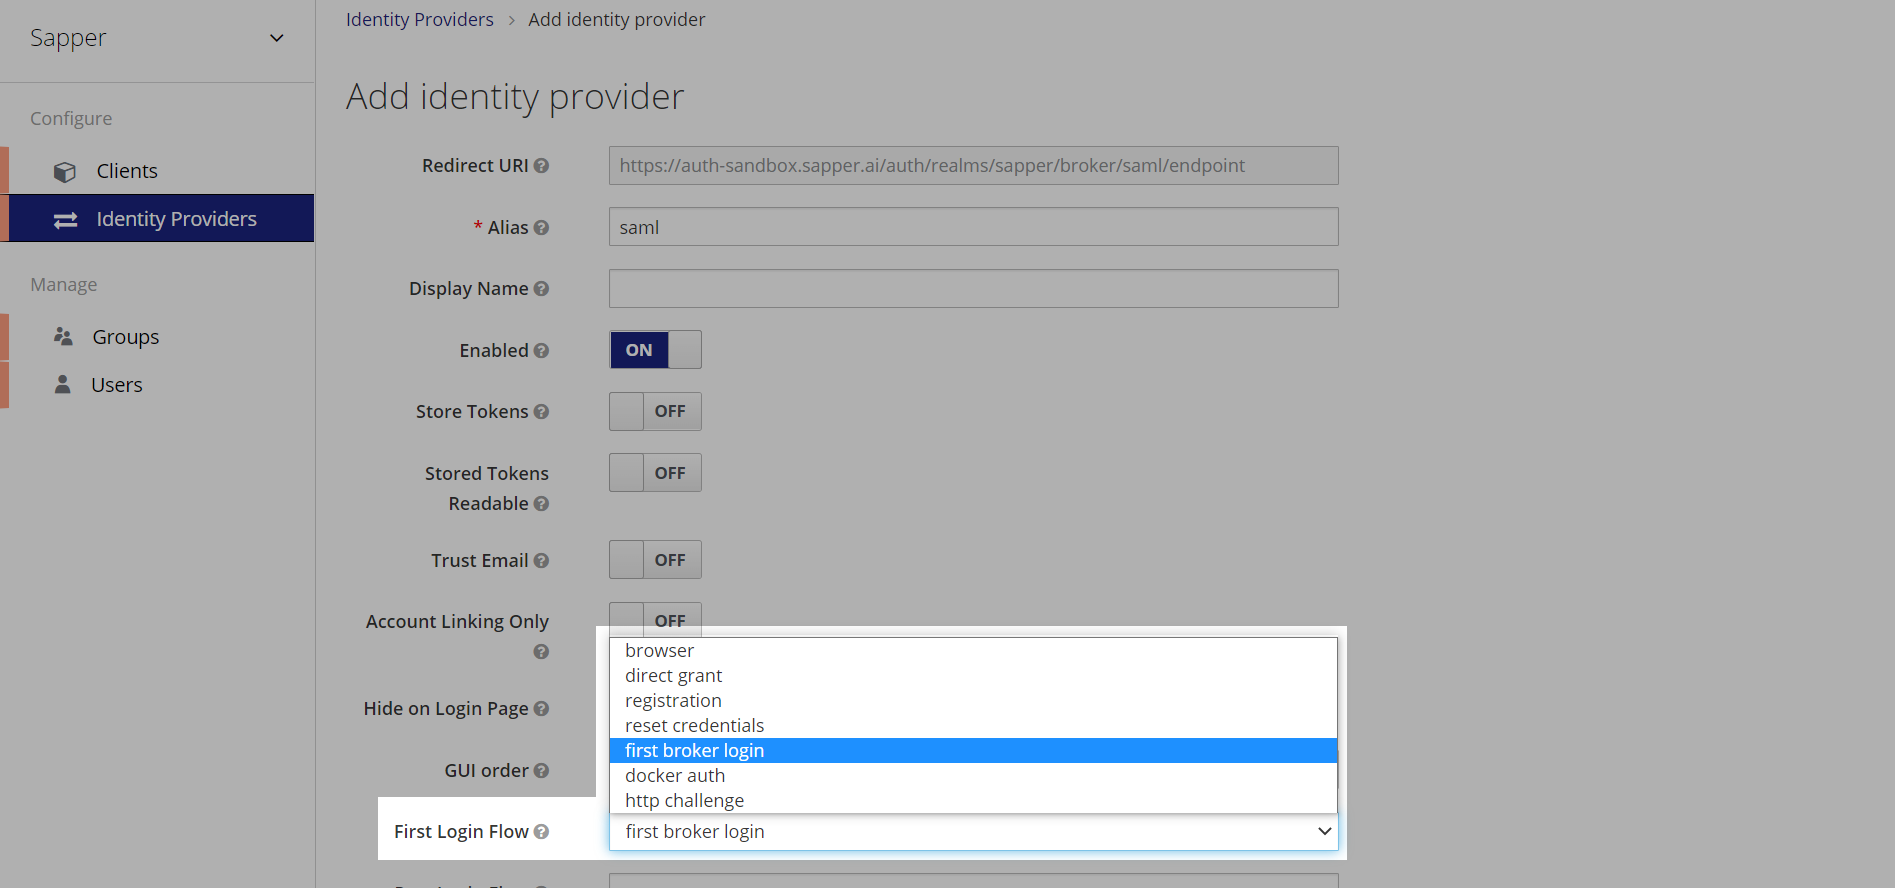
10. To configure the flow, you need to select the “First Login Flow”, from the dropdown. You will get the option for Browser, Direct Grant, Reset credentials, First Broker Login, Docker Auth, and HTTP Challenger. Here we have selected “First Broker Login”, you can select the required suitable one based on your requirements.
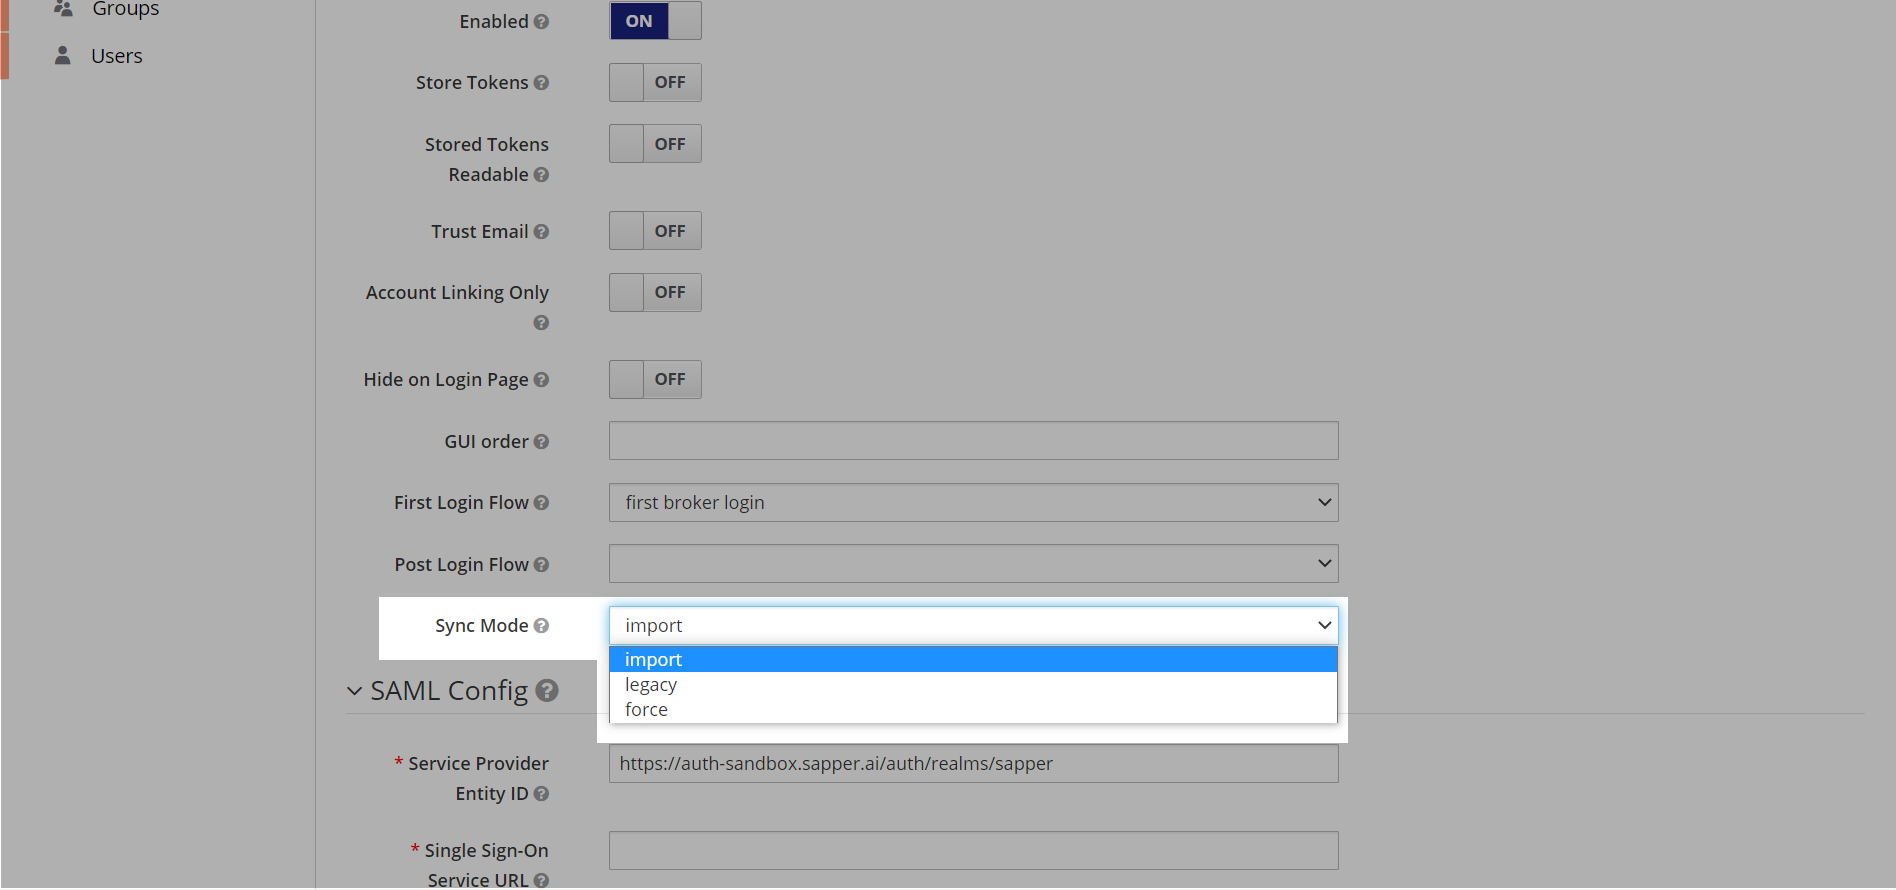
11. Select Now, select the “Sync Mode” from the dropdown list. You will get the option for Import, Legacy, and Force. Here we have selected the “Import” option to complete the synchronization.
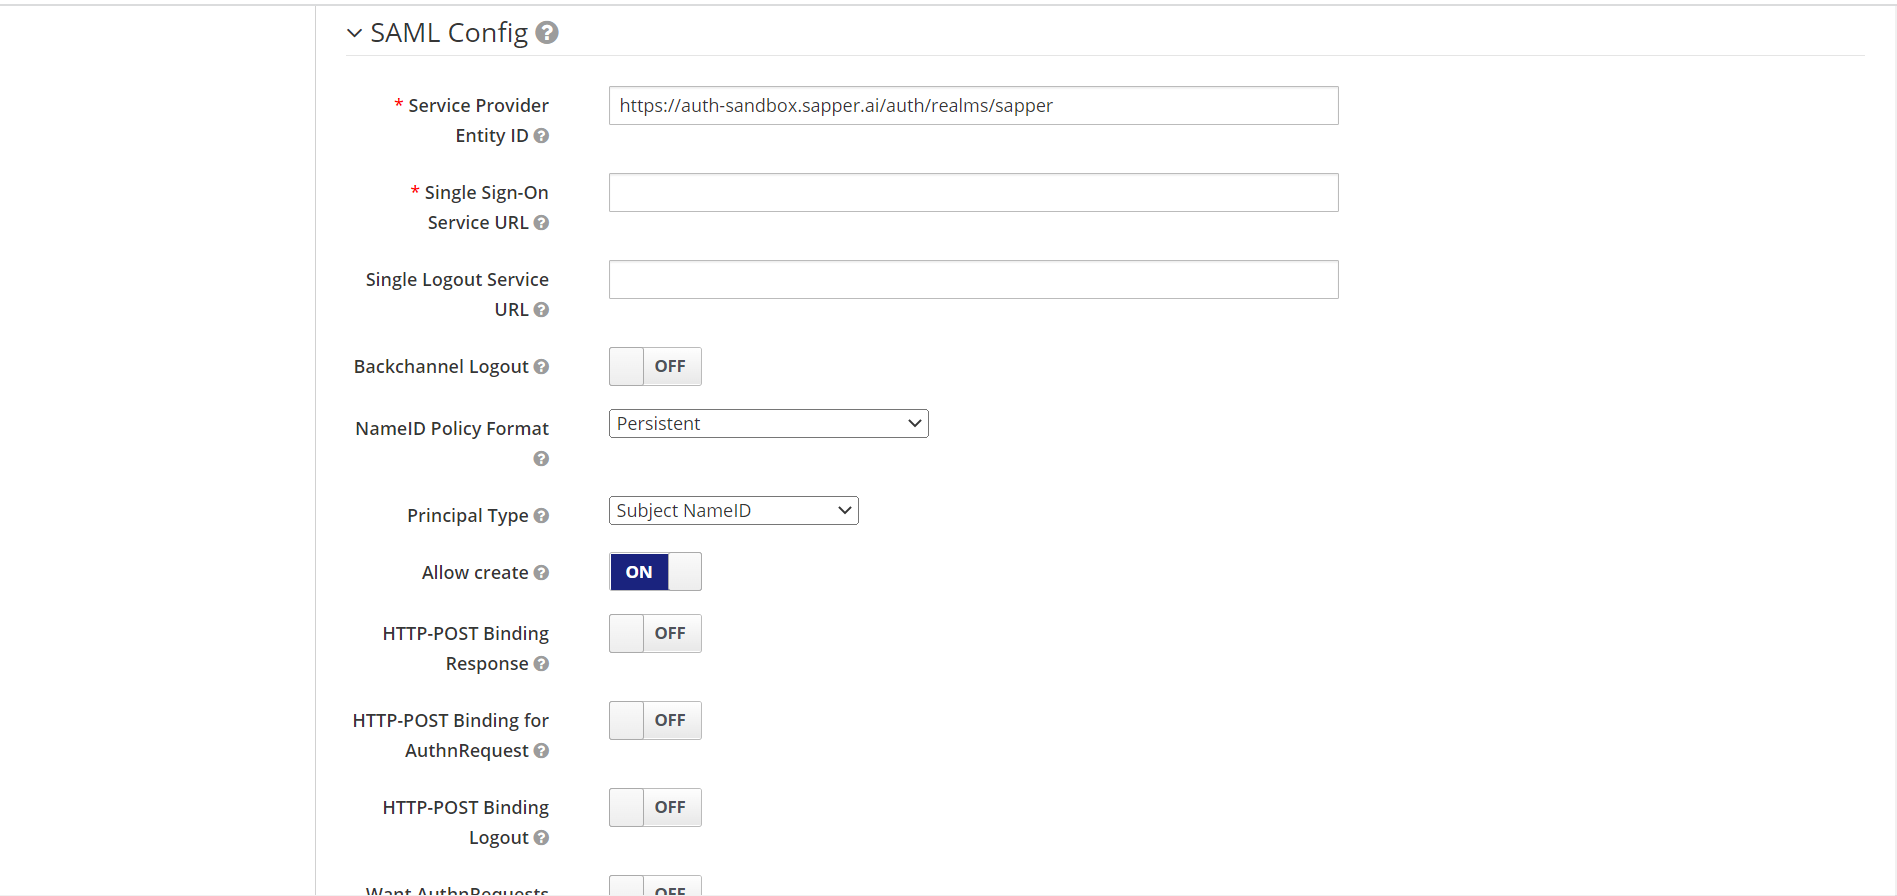
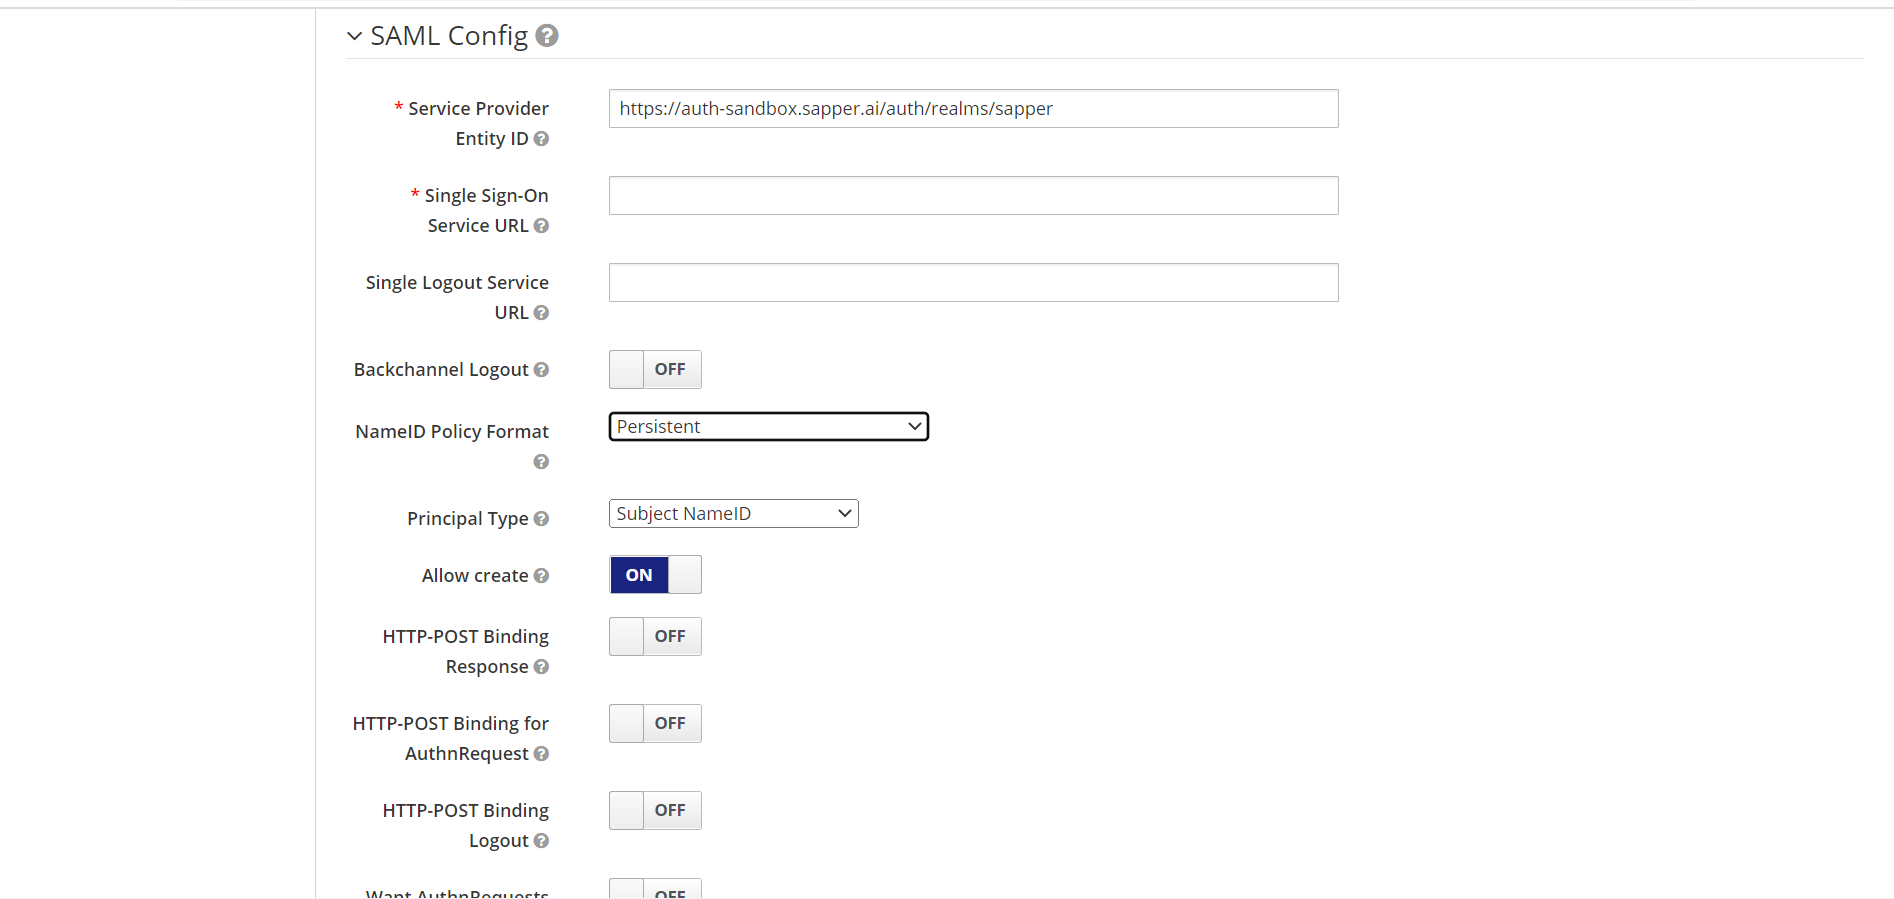
12. Now to To create SAML for the configuration you need to provide the “Service provider entity ID”, in the SAML Config field.
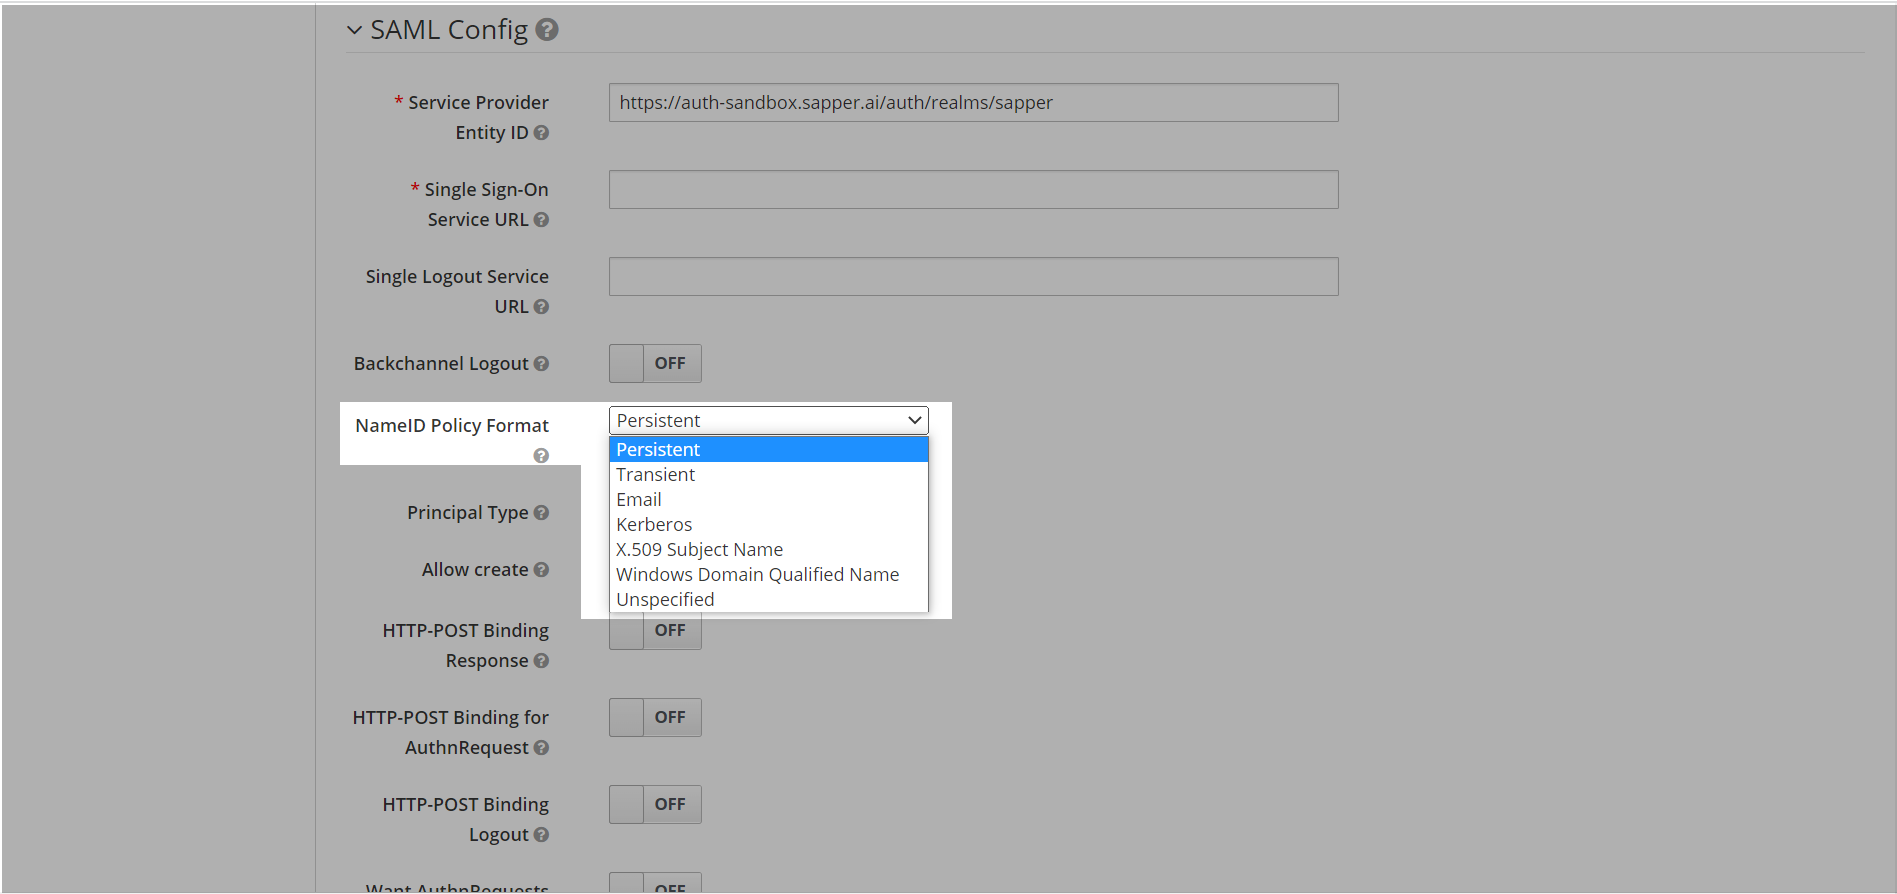
13. Select the policy format from the “NameID Policy Format” field. You will get the option in a dropdown and select , such as Persistent, Email, Transient, Kerberos, X.509 Subject name, Windows Domain Qualified Name, and Unspecified. Select the required one. Here we have selected persistent “Persistent” as a policy format.
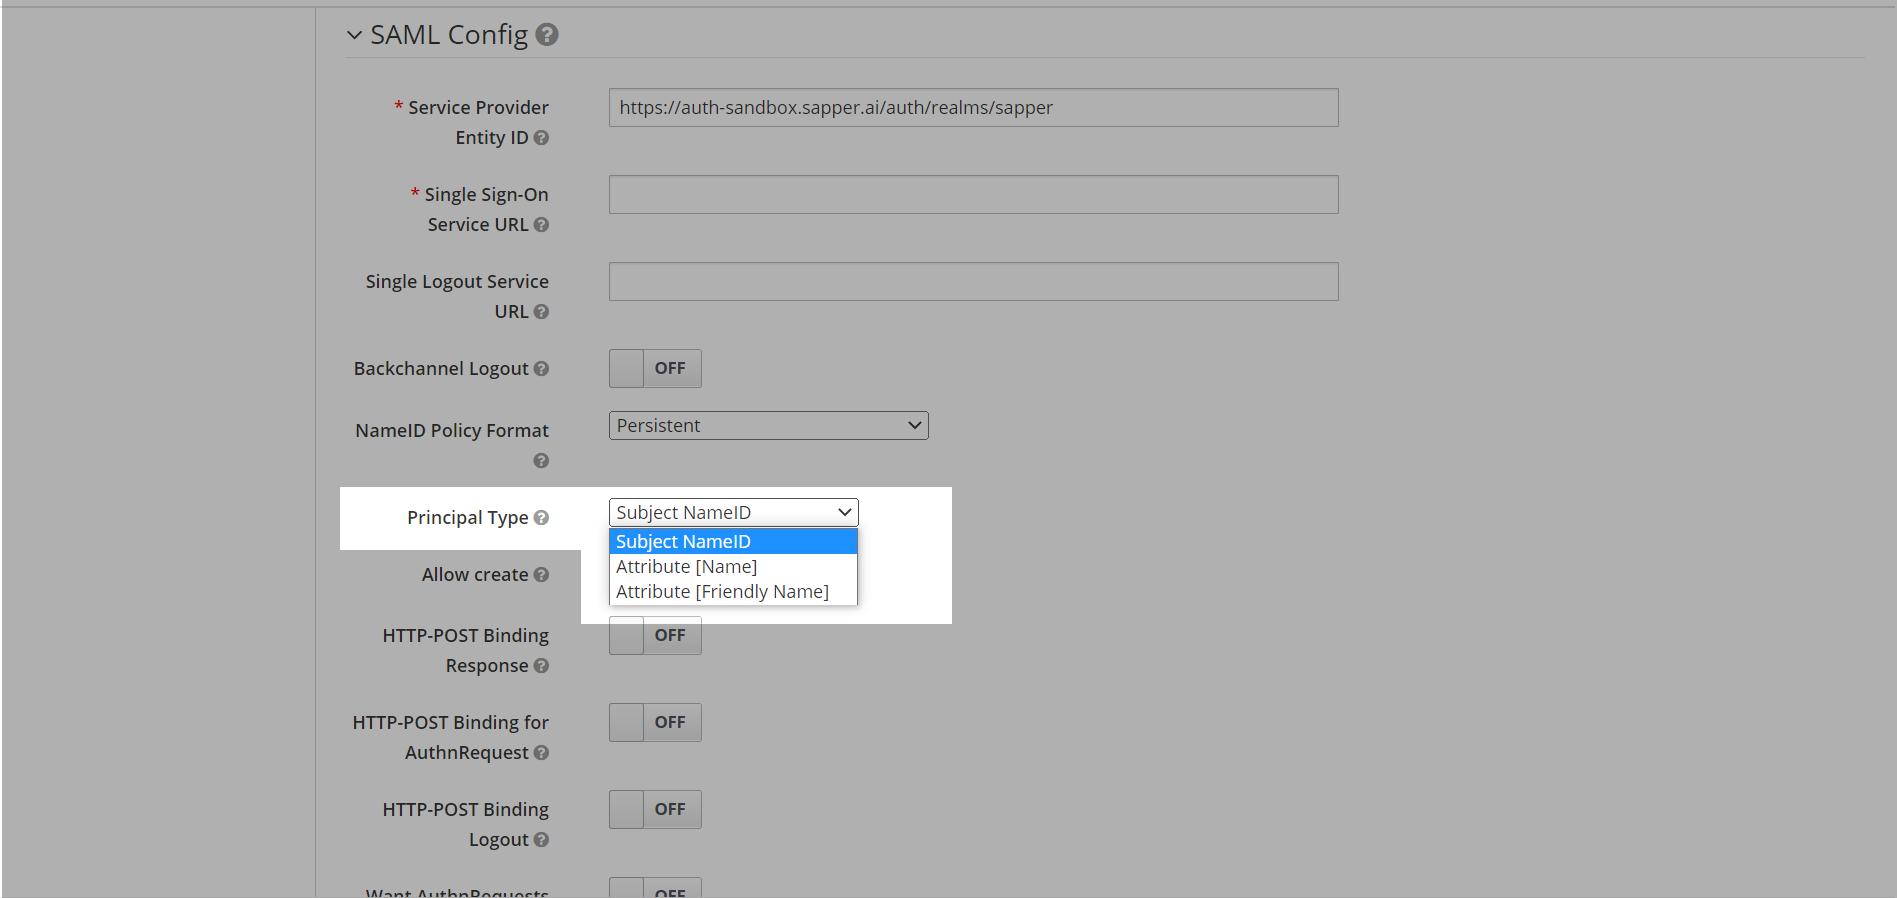
14. Now select the type of principal from the “Principal Type”. Select the required one on from the dropdown option. In the dropdown, you will get the options for Subject NameID, Attribute (Name), and Attribute (Friendly Name). Here we have selected “Subject NameID” as a principal type.
15. Enable the “Allow Create” field for providing configuration access.
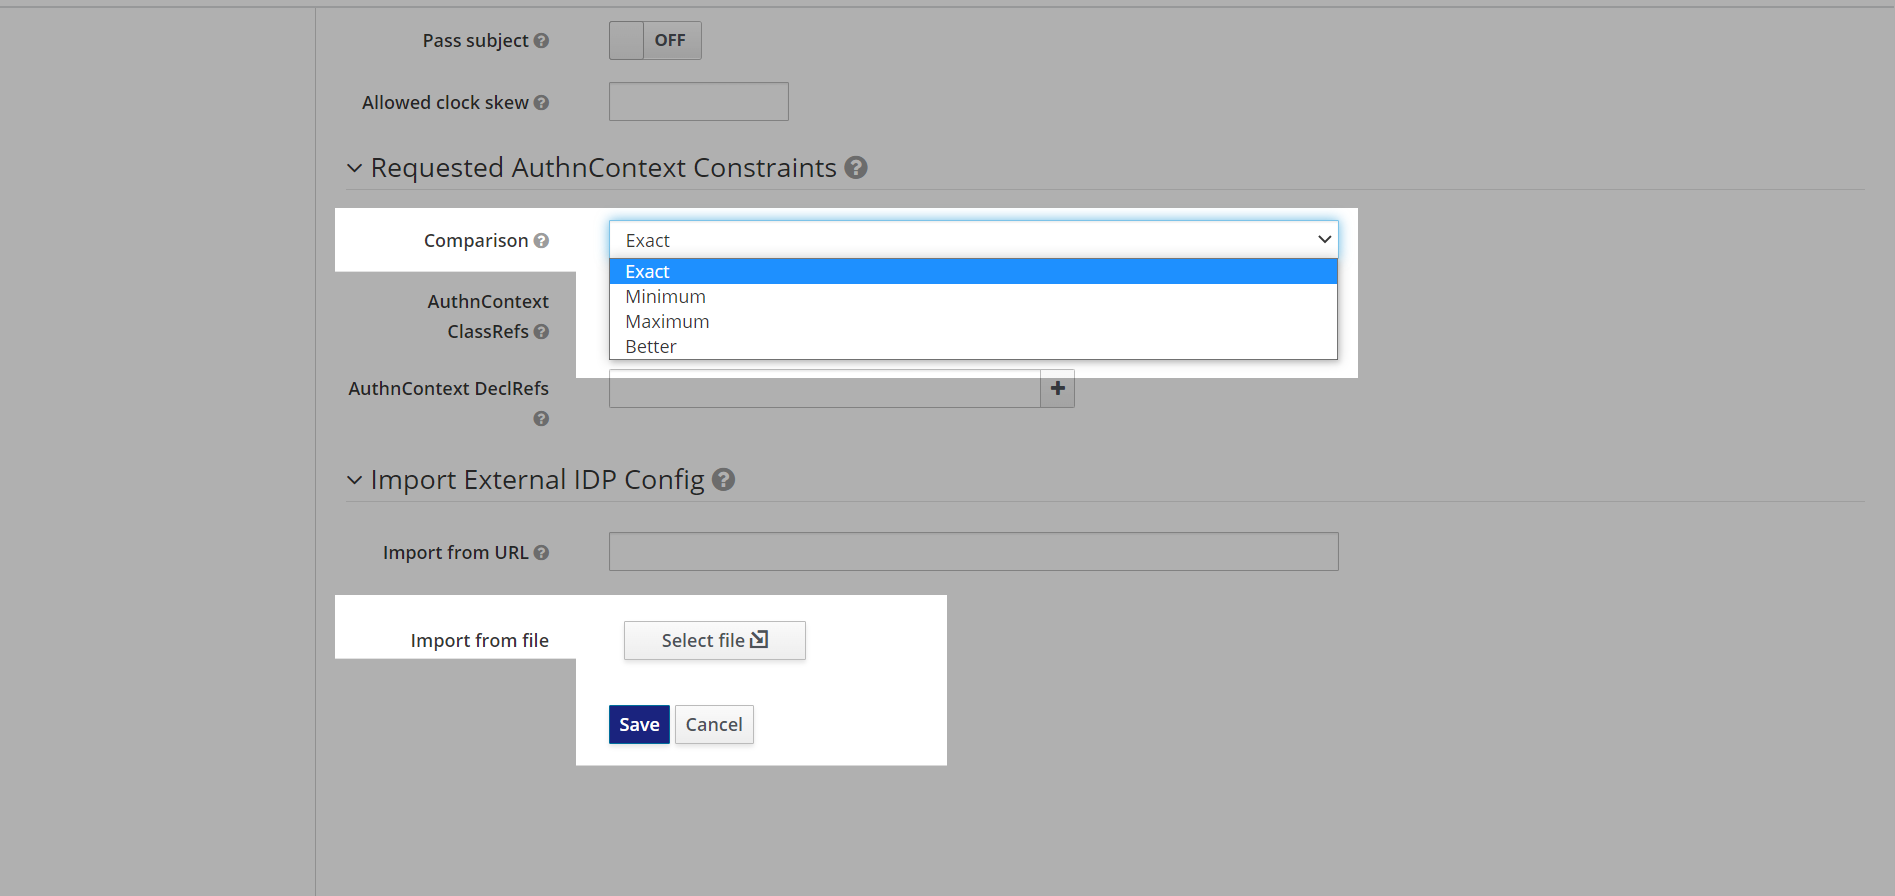
16. The next This field is associated with providing authentication provider. Select the comparison to complete the authentication from the “Requested AuthnContext Constraints” field. You can select the required “Comparison” from the dropdown list.
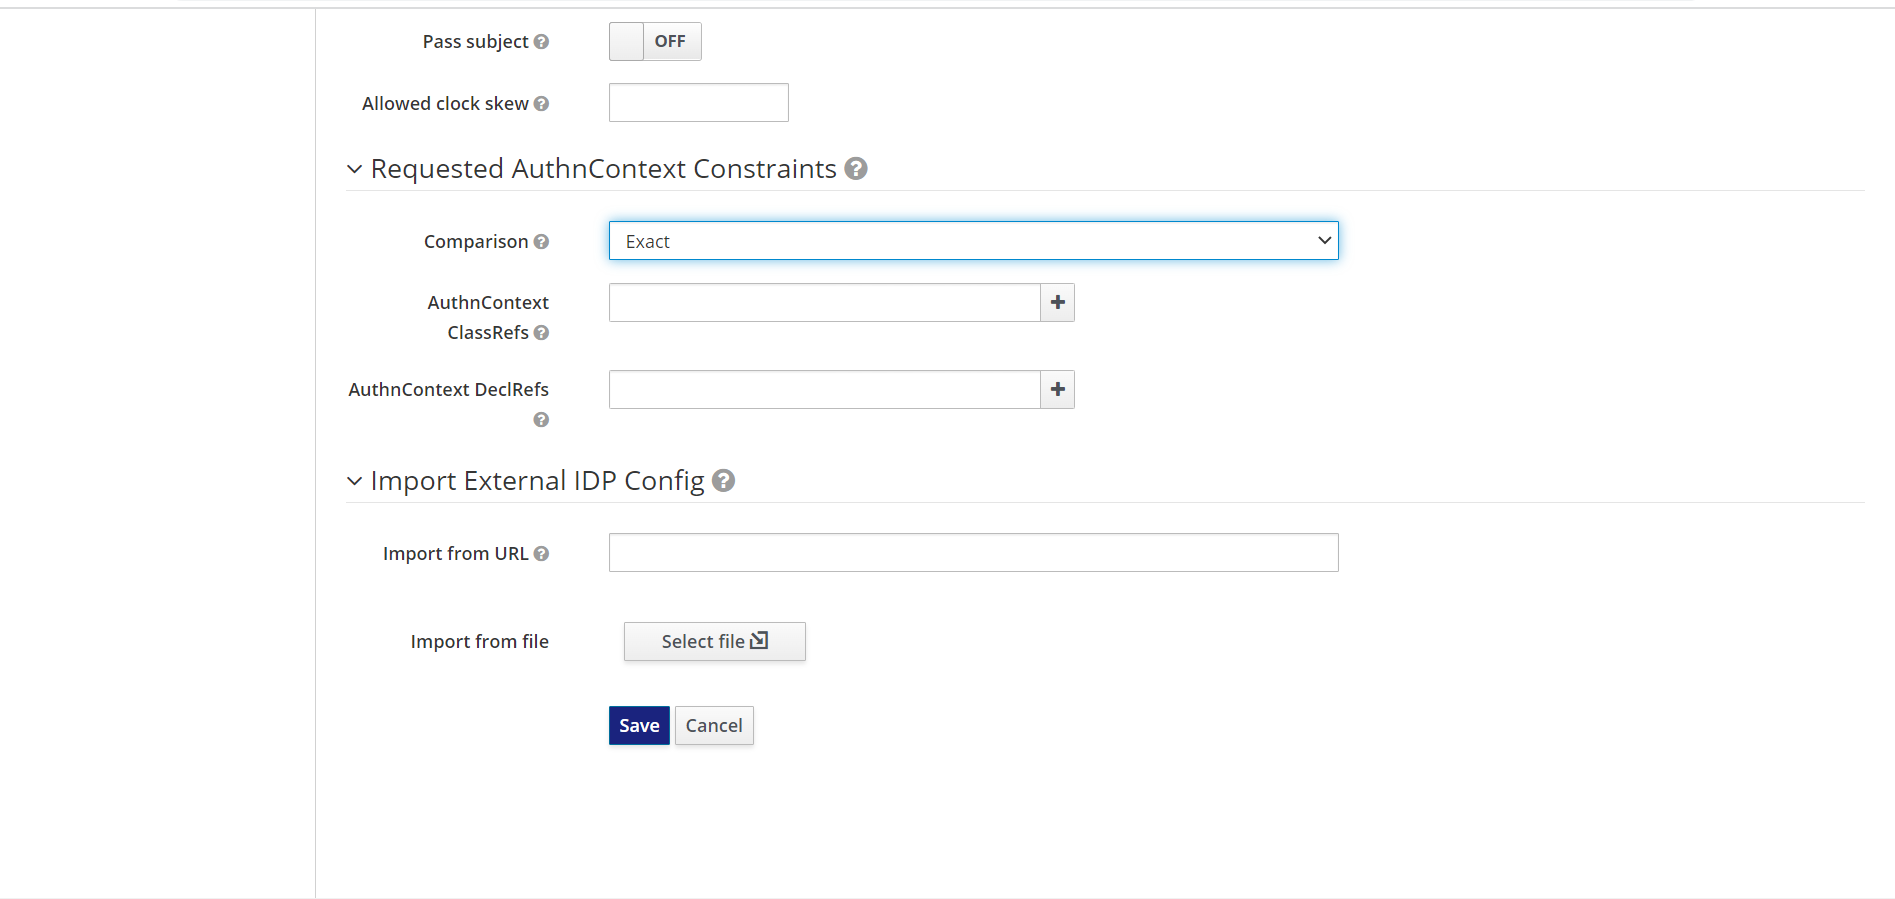
17. You will get the option of Exact, Minimum, Maximum, and Better. Here we have selected Exact, you can select based on your requirements.
1718. This field is associated with the Importing metadata. You can import the metadata from the Sapper SAML provider. It can be done from the “Import External IDP config” field. You can import the metadata by providing an import location URL, or by selecting a file from the device, from the “Import from File” field.
1819. Now, click on “Save” to complete the configuration.
Key | Description | Example |
|---|---|---|
Identity providers | An identification provider is a gadget entity that creates, maintains, and manages identification data for principals and additionally offers authentication offerings to depending packages inside a federation or allotted network. Identity companies provide person authentication as a service. | OpenID Connect and SAML v2.0. |
Alias | The alias service helps you to stores and retrieves aliases those are related to a federated identity. | |
Redirect URI | The redirect URI or response URL allow you to send an authorization code or access code once the authentication is successful. The URL is sends from the authentication server end. | https://auth_sapper.ai/auth/realms/sapper/broker/saml/endpoint |
First Login Flow | The First Login Flow is a workflow that allows you login for the first time to Keycloak from an external Identity Provider. | Browser, Direct Grant, Reset credentials, First Broker Login, Docker Auth, and HTTP Challenger. |
Sync Mode | The sync mode helps you to sync the useful information's based on your requirements. | Import, Legacy, and Force. |
Service provider entity ID | Service provider Entity ID is a globally unique name for your identity or service provider. This unique name is used to identify all parties involved in the SSO process. For service providers, the entity ID is automatically generated and the metadata URL is default. | https://auth-sapper.ai/auth/realms/sapper |
NameID Policy Format | It defines the name identifier formats supported by the identity provider. | Persistent, Email, Transient, Kerberos, X.509 Subject name, Windows Domain Qualified Name, and Unspecified. |
Principal Type | You need to choose the principal type for completing the configuration. | Subject NameID, Attribute (Name), and Attribute (Friendly Name). |
Allow Create | This option allows you to create SAML provider. | Enable or disable |
Requested AuthnContext Constraints | It helps the Identity Providers facilitate clients specifying constraints on the authentication method verifying your identity. | Exact, Minimum, Maximum, and Better. |
Import External IDP config | It allows you to import an external Identity provider for configuration purpose. It allows you to create, maintain, and manage identity information's for principals along with the authentication. |